Monday, August 28, 2017

Leather Wipes

These are Original BMW parts.  They are nice to keep in the car in the event of a spill on leather.  We keep one pack in each car in our family.

BMW leather wipes, QTY 10, PN 83192286941, $5.00r

Engine Performance Software

Like many BMW diesel owners, part of the appeal of the diesel engine to us was the mod-ability.  The engine responds really well to new, aftermarket software.  And, the risk, while BMW will tell you is quite high, seems low to me.  The piggyback chips are very hard, if not impossible for them to track down.  They are totally reverseable.  And, the US-spec 3.0 motor has many of the same internals as the higher output rest of world 6-cylinder diesels.  We waited for 20K miles before adding ours, after the car was trouble-free up to that point.  As always, feel free to do it your way.

Either way, we went with a Racechip Ultimate.  New performance is stated at 322 hp and 508 ft-lbs of torque.  The gains are obvious, immediate, and performance feels like a 5.0i gas engine.  You install the Racechip into a circuit on the fuel rail by unhooking only one connection, at the front of the engine.  Only takes a few minutes to install.  I mounted ours on the forward part of the driver's fender as shown.  I used industrial velcro and also tie wraps as backup.

Racechip Ultimate for F15 N57 35d,  $599.00r
Total investment in vehicle to date = $5401.28


Engine Air Filter Service

BMW wants to change the engine air filter every 30,000 miles.  They will change the CABIN interior air filters every 20,000 miles.  Seems to me that they have their priorities backwards.  On the other hand, a new engine air filter, PN 13718518111 retails for $68.75.  A new set of cabin air filters, PN 64119248294 (in bound air) and 64319194098 (recirc air) retails for $118.79, and $31.83, respectively.  So they went with the more expensive option. 

On our car, I pulled the filter and it was quite dirty with very small particles.  Based on this, and on how easy it is to change, I plan to change it every 15,000 miles from here on out.  The air filer on the US 3.0 D motor is under the engine cover at the rear of the engine near the oil dipstick.  To remove it, you un-clamp 2 metal spring clamps, and you are out.

In my research, and based on how the OE filter is marked, a Mahle filter part number LX 2796/1 would be a good replacement for the OE one, probably for less cost.

Engine Air Filter, OEM BMW 13718518111, $68.75r
Total investment in vehicle to date = $4802.28

Engine Air filter is located here.  Release the silver metal clamp shown, and the one on the opposite side to remove and replace the filter.

20K on the left, new on the right.

20K filter.  Basically black with soot and dirt.

New

20K filter on the left, new on the right.  Doesn't look too dirty in this pic.

Hardwired Escort Radar Detector

I hardwired an Escort 9500ix radar detector into the car.  I had initially planned on a complete stealth system but cannot afford the time to install on right now.  So this will have to do in the mean time.

For power, I tapped into fuse #42 in the forward passenger footwell fuse box (there is more than one fuse box in the F15!).  42 is nice because it's for the UGDO transmitter and PDC and it's switched power.  I used an adapter I bought from Amazon.  For ground, I tapped into the all-brown wire on the passenger side footwell light harness, right by the fusebox.  Lastly, I have found it's nice to have a remote mute button to silence the detector.  So I used one from Escort.  I was able to fish the remote wires below the steering column through the Lycra-like material and mount the mute button under the steering wheel.  I took care to make sure there was enough wire slack in all possible steering wheel positions.  Lastly, I covered the LEDs on the mute button assembly with black electrical tape.  No need for more stray light in the cabin.

I ran the wires up and down the A-pillars.  The trim is easy to remove.  The door seals are easy to pry back a little and there is even a small channel behind them to contain the wires.  It's laborious, took me about 90 minutes, but it's nice to have it all integrated and also have a remote mute button.

Escort 9500ix Radar/Laser Detector, $329.99 from Amazon
Radar Mount add-a-blade fuse, $8.99 from Amazon
Escort Sticky Cup Radar Mount, $30.37 from Amazon
Escort Smartcord, $22.99 from Amazon


Monday, June 5, 2017

Trailer Hitch

The trailer hitch options for the car range from inexpensive (the route I took) to very expensive.  It's a shame the car didn't come with factory trailer hitch standard, let alone options, as I think most of us have trailering needs at least occasionally.  Personally, we have very limited applications.  If I trailered a lot, I might consider Invisihitch options.

At any rate, this is the route I took.  I bought a Draw Tite hitch and a 4-prong harness from eTrailer.com.  This hitch fits the stock 2016 car perfectly and requires no cutting of the bumper.  The 4-prong harness will get the job done, but unlike Invisihitch/OEM kits, it does not disable the rear park distance control and offer other cool camera options.  You have to disable PDC manually.

The install was straightforward but tedious.  The video instructions from eTrailer are very good, but there are a LOT of plastic clips on the F15.  I took some pictures of the rear bumper cover removed so maybe you can get a better idea of where they are.  You need to take your time with this mod in order to not scratch or mar the car.

I have owned a Draw Tite hitch before.  And, while they come nicely powder coated or painted, they do tend to rust after many years.  To add some protection for this one, I roughed the surface with 0000 steel wool and added a coat of semi gloss Rustoleum paint to this one.  Hopefully that will help some.  I found the best price for the hitch on Amazon that particular day.  Amazon shipped the hitch basically unboxed with a shipping label on it.  It arrived seriously scratched.  I complained and asked for a replacement, the replacement came in a box and was properly wrapped.

For the wiring, I ran my wires out of the car on the right/passenger side, by modifying an unused grommet and sealing it with black RTV silicone.  This way the trailer harness is available by the hitch, and we don't have to do the "close the harness while it is sticking out of the tailgate" thing.  It's a little more factory-like.  I did have to cut the eTrailer harness to do this, but my solder and heat shrink connections are all inside the vehicle and not out in the elements.  The F15 uses modulated signals for brake and tail lights, so you only connect 1 trailer harness wire to the car for both and the eTrailer wire harness module can figure out if the signal is for tail lights or brake lights.

Draw Tite 75600 Hitch Class III 2" receiver, $171.58r
eTrailer 119190KIT 4-prong wire harness from eTrailer.com, $75.95r

Total cost of this mod = $247.53
Total investment in vehicle to date = $4733.53


Black RTV inside and outside of this grommet


I mounted the trailer light controller on the right/passenger side.  It fit nicely into an unused spot.  But, this required extending the wiring to the left/driver's side tail light.


Clips around inner tail light

Center clips


No trimming required.


I didn't use the replacement rivets provided by Draw Tite.  Their heads were much smaller than stock.  I did try to use the original BMW ones (bought new) but my rivet gun could not accomodate metric (I assume) size.  I ended up using some Z3 rivets I had in stock.
These are what BMW uses to hold the wheel arch trim in place.  But, my US-sized pop rivet gun couldn't run them.


Mud Flaps

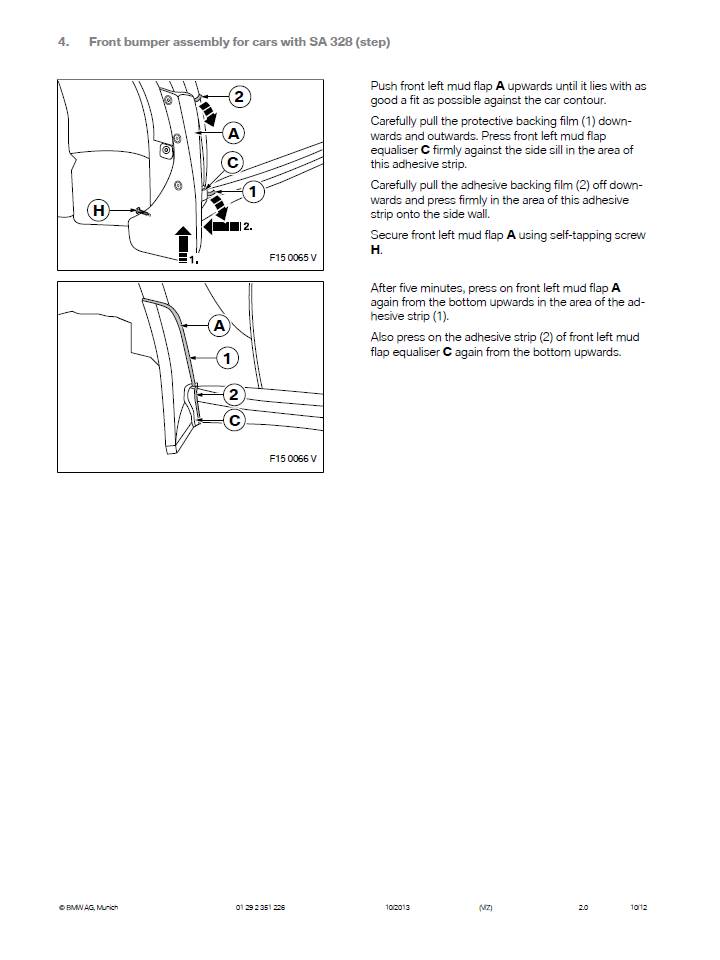
Installed Original BMW mud flaps, front and rear.  The fronts are tricky if you have running boards (Option 328) like we do.  You basically have to cut the stock mat to fit the running board.  Sort of a pain.  BMW does include a template help you create the cut so it's not a huge deal.  Since accessory installation instructions can be hard to find and/or not supplied with the parts, I am uploading a copy here.  Blogger won't let me host PDF copies, so you will have to page through them one by one, sorry!

I didn't remove any of the wheels to install any of the flaps.  For the fronts, you can turn the steering wheel for access.  For the rears, I had the rear of the car on jackstands to install a trailer hitch, and there was enough room.

Front Mud Flaps, set, BMW 82162302402, $100.00r
Rear Mud Flaps, set, BMW 82162302408, $100.00r

Total Cost of this mod = $200.00r
Total Investment in Vehicle to Date = $4486.00


Here is a shot of the rear flaps installed.

Tuesday, May 16, 2017

Driver's Window Replacement

My wife was driving the car home from work the other day on the local interstate, and an object from what she thinks was the oncoming side of traffic hit her driver's side window.  It shattered the glass.  Only the tint held the glass in place.  Luckily the window was up and luckily the glass didn't shatter inwards onto her.

South Carolina insurance covers all vehicle windows with zero deductible and even covers OEM glass.  So, the glass was replaced with a new piece of OEM BMW.  The local company who did the work was called Clear View Glass, and the service guy (owner?) who did the work was named Jason.  He was a total professional.  He was able to carefully remove the glass almost in one piece, once the door panel was removed from the inside.

Later the same day, my wife had the aftermarket window tint replaced with new.  Theoretically, maybe I could have tried to get insurance to pay for the tint, and they probably would have, but I didn't try.  We had a bad experience with the original tint person we used, so we would never go back there (or recommend him for any work, ever).  So instead, Jason from Clear View suggested the best tint shop in town, Palmetto Tint Shop.  Palmetto doesn't carry the Llumar film we had on the car.  Instead, they sell Huper Optik.  The color match was right on the money and they installed it onto the new window without issue or drama.  Supposedly the Huper Optik is more durable than Llumar and it rejects heat better.  They had a heat lamp demonstration in the showroom and it was obviously better at insulating from heat.  If you go to Palmetto, ask for Brian and tell him X5nut sent you!

Total cost of this mod = $100
Total investment in vehicle to date = $4286.00


Wednesday, May 10, 2017

Second Opticoat Video

Blogger would only let me upload one video per post.  Here is a second one showing the Opticoat during a washing.

Youtube Link to Opticoat Pro Plus on X5


Tool Kit

I went back and forth on what tool kit to put into the car.  BMW does sell some decent tool kits (see part number 82292151462, for example) but their kit isn’t very comprehensive for what you get.  Instead, I bought a Proxxon (German made) tool kit.  I had bought Proxxon before from Ride West BMW Motorcycles when we lived in Seattle.  Really nice stuff, on par with Facom or Snap-On.  This time, bought from Amazon.  The kit is kit number “Proxxon 23080 36 Piece Socket Set with 1/4 inch Square Drive” and I paid $64.60 shipped for it from Germany.  The kit doesn’t have everything… I’d like to add a pair of larger pliars (bigger than the Leatherman ones already in the car) and also an adjustable wrench, but it’s a good start.  Fits nicely into the area on the left side of the car near the rear tail light.

Total cost of this mod = $64.60
Total investment in vehicle to date = $4186.00


Tuesday, May 9, 2017

More Paint Protection Film and Opticoat Paint Coating

After about 15,400 miles, I wasn’t happy with the rock chips on the hood.  So, we took the car back to Chris Arthur at Arthur’s detailing and added clear paint protection film on the whole hood (no lines) and also small pieces on the front fenders.  Chris installed the film then re-applied Opticoat Pro Plus on top of the film.  I should have done the whole hood when we took the car in the first time.

Total cost of this mod = $400
Total investment in vehicle to date = $4121.40


Here is one of 2 videos of the Opticoat shedding water.  It is amazingly hydrophobic.  Water just sheets off the car and the car seems to stay cleaner longer than anything I have ever seen.  The whole car has Opticoat Pro Plus on it.  Even the black plastic unpainted trim and the wheels and door jambs.  This post was just to show you the hood.


Saturday, December 10, 2016

Suspension Airbags Replaced

Shortly after the first service, the rear suspension airbags - on both sides - failed completely.  There were no fault codes.  But, the car was metal-on-metal in the rear and it was obvious.  We had to have the car towed to the dealer again.  The dealer was very nice, they believe they must have cut or scored the airbag material during the fix of the differential leak.  The airbags retail for $398 each.  You can replace them quite easily DIY, all from below the car.  Hopefully you never have to.


Friday, November 4, 2016

First Dealer Service

Took the car in for it's first "free" oil change at about 10,600 miles.  We used Rick Hendrick BMW in Charleston and they did a nice job.  They fixed the leaking differential seal and put new oil into the differential.  They confirmed on the F15 there is no drain plug for the differential.  So to change it, you either remove the rear cover or you use a fluid extractor.  I come from the old school and I like to change fluids on a regular basis.  You can see the part number for the correct fluid below... FYI cars with Dynamic Handling Package (DHP) have a different differential but both use the same fluid.

They used 0W-30 for motor oil.  We have been using 5W-30 with excellent results: no oil is burned by this car.  But, the manual for the 2016 does say that 0W-30 is the preferred oil, so we'll try it I guess.  I am going to continue to change the oil every 5,000 miles so we will alternate free / me until the free service runs out.

The car used three 2.5 gallon containers of AdBlue.  Not sure what the exact tank volumes are for the active and passive tanks, but that's a lot of AdBlue!

One of the techs did manage to scratch the intake plenum in the engine bay.  We mentioned it to the service advisor and he agreed to replace it without question.

We asked about diesel fuel contamination and the service manager reported they rarely if ever see it.  Much more common is people putting gasoline into their diesels.  We asked how common the leaking differential is and he didn't think it was very common on the F15 but they did see it often on the E70 X5s.

Details of the oil change.  Note the AdBlue Diesel Exhaust Fluid.  Part number is for a 2.5 gallon jug.  Also note the -951 oil part number, that's 0W-30 LL12.

Parts reacquired to fix the leaking differential.  Some hardware is one-use-only.  The differential did have to come off the car for the fix but the rear subframe did not.  They did do an alignment on the car once the new eccentric bolts were installed.  Part number for F15 X5 differential oil is shown there too, you need 2 liters for a change.

Friday, October 14, 2016

Wet differential

When I jacked up the rear end of the car to fix a punctured tire, I saw this.  I have seen at least one other post about a leaky rear differential.  I iwll mention this to BMW at the first service.  The leak is minor, but it should be dry there.


How to Jack an F15 X5 (rear)

Haven't seen any posts on how to do this.  Here is how I did it.  As always, feel free to do it your way.

On many of the newer BMWs, I have seen BMW official documents that say it is OK to jack using the rear differential.  This is unusual to me because on cars like the Z3/E36, this was forbidden.  So I'm not comfortable with it.  Still, I could not find any official BMW documentation on F15 jack points.  I haven't bought a 24-hour subscription to TIS yet to verify.

I needed to jack up our car to patch a puncture in a run flat tire.  This is the second puncture in less than 10,000 miles.  Bummer.  For the first patch, the tire guys (Hay Tire Pros in Charleston) scratched both the rim and the Xpel on the front bumper.  Not cool.  I will never go there again.  For this repair, I am taking the wheel (not the car) to my wheel guy, Hugh Jett at Jett Wheels of Charleston.  Hugh doesn't normally do tire repairs but he will for previous customers.  Anyway, I jacked up the car to put it on jackstands while Hugh fixes the tire.  I used the rear subframe as my jackpoint.  To access it, the jack needs to go in under the car at an angle because the center input pipe to the muffler is in the way.  I used a piece of 2x4 to help spread the load.  Worked like a champ, no issues.  Esco jackstands work perfectly with the F15 side jack pad receivers.

UPDATE: Bimmerpost member E90Fleet posted this diagram directly from TIS.  It shows you can jack directly by the differential.  That still scares me.  Also shows the front jack point and mentions you can jack by the outboard subframe points in the rear.


F16 Leather Knee Pads


For this mod, I followed the excellent how to provided here:  http://f15.bimmerpost.com/forums/showpost.php?p=20110778&postcount=1

The only deviation/change I have is with respect to installing the passenger side knee panel.  The F15 X5 center dash does angle slightly towards the driver.  It is not as obvious as say the E30 center console, but it is biased to the driver.  This creates a clearance issue for the passenger side panel.  The front clip of the knee pad cannot mate with the female slot on the center console.  There isn’t enough space.  My solution, which wasn’t mentioned in the link above, was to leave the 2 T20 silver screws out of the new bracket (comes with the knee pad part).  This way the bracket can float a little.  Dock the metal locking tab into the center console completely.  Then drive home the 2 silver T20 screws from the passenger side.  This will help greatly.  In fact, I cannot see doing it any other way without scratching something.  Other than that, this is a great mod.

51169299125, Left Knee Pad, Black Dakota Leather with Black Stitching, $263.14r

51169299126, Right Knee Pad, Black Dakota Leather with Black Stitching, $263.14r


Total cost of this mod = $526.28r

Total investment in vehicle to date = $3721.40


"Before"


"After"